 |
| Thomas' Legion |
| American Civil War HOMEPAGE |
| American Civil War |
| Causes of the Civil War : What Caused the Civil War |
| Organization of Union and Confederate Armies: Infantry, Cavalry, Artillery |
| Civil War Navy: Union Navy and Confederate Navy |
| American Civil War: The Soldier's Life |
| Civil War Turning Points |
| American Civil War: Casualties, Battles and Battlefields |
| Civil War Casualties, Fatalities & Statistics |
| Civil War Generals |
| American Civil War Desertion and Deserters: Union and Confederate |
| Civil War Prisoner of War: Union and Confederate Prison History |
| Civil War Reconstruction Era and Aftermath |
| American Civil War Genealogy and Research |
| Civil War |
| American Civil War Pictures - Photographs |
| African Americans and American Civil War History |
| American Civil War Store |
| American Civil War Polls |
| NORTH CAROLINA HISTORY |
| North Carolina Civil War History |
| North Carolina American Civil War Statistics, Battles, History |
| North Carolina Civil War History and Battles |
| North Carolina Civil War Regiments and Battles |
| North Carolina Coast: American Civil War |
| HISTORY OF WESTERN NORTH CAROLINA |
| Western North Carolina and the American Civil War |
| Western North Carolina: Civil War Troops, Regiments, Units |
| North Carolina: American Civil War Photos |
| Cherokee Chief William Holland Thomas |
| HISTORY OF THE CHEROKEE INDIANS |
| Cherokee Indian Heritage, History, Culture, Customs, Ceremonies, and Religion |
| Cherokee Indians: American Civil War |
| History of the Eastern Band of Cherokee Indian Nation |
| Cherokee War Rituals, Culture, Festivals, Government, and Beliefs |
| Researching your Cherokee Heritage |
| Civil War Diary, Memoirs, Letters, and Newspapers |
|
|
|
|
Civil War Battle of Bentonville History
A Summary of the Battle of Bentonville
March 19-21, 1865
Bentonville Battlefield State Historic Site
| Mower's Attack on the Confederate Left |
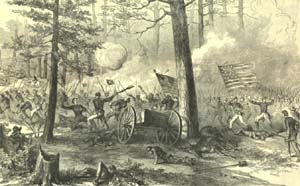
|
| East of Bentonville, March 21, 1865 (Harper's Weekly) |
On March 19, 1865, Joseph E.
Johnston organized his forces into a hook-shaped line at Cole's Plantation, blocking the Goldsboro Road. That morning William T. Sherman's Federal Left Wing stumbled into the
Confederate trap, just as it was being set. After a Union probing attack failed, the Confederates
launched a massive assault which drove Gen. William P. Carlin's XIV Corps division from the field. Morgan's division managed
to hold on despite being surrounded on three sides by Confederate adversaries. Late that afternoon a strong Federal defense
of the Morris Farm by the Left Wing's XX Corps managed to squelch the Confederate advance. The first day's fighting ended
in a tactical draw.
Failing to completely crush the Union lines, Johnston's Confederates pulled back to
positions held earlier in the day, and Sherman's Right Wing began arriving on the battlefield by midday on March 20. Sharp
skirmishing prevailed, as the Confederates changed position to deal with the arrival of the Federal Right Wing. The junction
of Sherman's divided army at Bentonville placed nearly 60,000 Union troops (including reserves) against Joe Johnston, who
had brought to the field approximately 16,000 infantry and 4,000 cavalry with which to oppose Sherman. Despite receiving limited
reinforcements, the Confederates were no match numerically for the powerful Union army.
Johnston
clung to a tenuous position guarding his army's sole escape route over rain-swollen Mill Creek, and began evacuating his wounded
to Smithfield, 20 miles to the north.
To Sherman's great irritation, he found the Confederate army still in position on
March 21. The Union commander was anxious to reach Goldsboro, and was impatient for the Confederates to retreat. Johnston,
outnumbered and no longer holding the advantage of surprise, could only hope that the Federals might be lured into a costly
frontal attack on his small but well-entrenched army.
For two days following the main battle of March 19, the opposing
forces squared off in a severe and continuous skirmish fight. On March 21 Sherman's Right Wing moved to within a few hundred
yards of the left half of Johnston's army. That afternoon, a "little reconnaissance" by Gen. Joseph A. Mower's XVII Corps
division escalated into a full-scale push toward Mill Creek Bridge on the Confederate left flank.
Mower's charge overran
Joe Johnston's headquarters, forcing the general and his entourage to beat a hasty retreat. At this critical juncture a well-orchestrated
Confederate counterattack, led by Lt. Gen. William J. Hardee, quickly descended upon Mower's two brigades and forced them
back. Sherman was furious with Mower's advance, fearing it
would bring on the general engagement he wanted to avoid. The Union commander called a halt to the operation, but not before
Mower's men were roughly handled by a combination of Confederate cavalry and infantry. Hardee's bold action assured Johnston the use of Mill Creek Bridge, his only means of egress from
the battlefield. But the triumph of forcing the Federals back came at a personal cost to General Hardee. His only son, a youth
of sixteen in the 8th Texas Cavalry, was mortally wounded in the charge against Mower. With no further advantage to be gained
by holding a position at Bentonville, Johnston's weary troops abandoned their works during
the night and withdrew toward Smithfield.
On March 22 Federal
forces pursued the retreating Confederates as far as Hannah's Creek before giving up the chase. Sherman
was content to let Johnston escape, fully expecting to have
to deal with him again at a later date. But the Confederate withdrawal cleared the way for Sherman
to occupy Goldsboro, which was foremost in the general's mind.
His army needed rest and provisions, and Sherman also wanted to have the additional
forces of J. M. Schofield and A. H. Terry before tangling with Johnston
again.
The armies of Sherman,
Schofield, and Terry converged on Goldsboro and occupied the
town for two and one-half weeks in preparation for the final leg of the campaign.
On April 26, 1865,
Johnston laid down Confederate arms on Sherman's terms at the
Bennett Place near Durham, in the largest troop surrender of the American Civil War. See also Battle of Bentonville.
| Battle of Bentonville Battlefield Map |
|
| Civil War Bentonville Map |
Sources: North Carolina Office of Archives and History; Bentonville
Battlefield State Historic Site.
Tags: Civil War Bentonville Battle of Bentonville History Summary North Carolina Details Facts
Pictures Timeline Battlefield Map Union Confederate Positions Casualties Fatalities Killed Wounded Soldiers List
|
|
|
|
|
|
|
|
